接着上一篇文章,任务目标依然是通过使用Transformer将英语翻译为意大利语,来理解Transformer是如何编写和训练的,同时本文还将通过可视化观察注意力模型的细节。文中将使用Hugging Face的opus_books 作为训练集,通过Hugging Face的工具链完成数据集的下载,和将文本转换为词表的工作。
1 Tokenizer 观察数据集,可以发现Hugging Face提供的数据都是成对出现的原文(英语)-译文(意大利语)字典。第一步是下载数据集,并创建tokenizer(也译为分词)。
Tokenizer在Input Embedding的输入之前,用于将句子拆分成token从而构建词表(其中还将包括用于让模型识别的特殊token,如用于padding的、用于标识句子起止位置的等等),tokenizer的种类有很多 ,如BPE tokenizer (按频度统计分出词根)、Word tokenizer (按空格和标点分词)、Subword tokenizer (高频词不分,低频词分出有意义的subword或词根)。本文以教学为目标,因此选择使用最简单的Word tokenizer。
新建文件train.py用于训练模型。
安装Hugging Face的datasets和tokenizer库用于下载数据集和调用分词器(pip和conda都可以)。
编写函数用于创建分词器:
1
2
3
4
5
6
7
8
9
10
11
12
13
14
15
16
17
18
19
20
21
22
23
24
25
26
27
28
29
30
31
32
33
34
35
36
import torchimport torch.nn as nnfrom torch.utils.data import Dataset, DataLoader, random_splitfrom datasets import load_datasetfrom tokenizers import Tokenizerfrom tokenizers.models import WordLevelfrom tokenizers.trainers import WordLevelTrainer from tokenizers.pre_tokenizers import Whitespace from pathlib import Pathdef get_or_build_tokenizer (config, ds, lang ): """ 创建分词器 参数: `config`: 模型的配置 `ds`: 数据集 `lang`: 分词器的语言 返回: `Tokenizer`分词器实例 """ tokenizer_path = Path(config['tokenizer_file' ].format (lang)) if not Path.exists(tokenizer_path): tokenizer = Tokenizer(WordLevel(unk_token='[UNK]' )) tokenizer.pre_tokenizer = Whitespace() trainer = WordLevelTrainer(special_tokens=["[UNK]" , "[PAD]" , "[SOS]" , "[EOS]" ], min_frequency=2 ) tokenizer.train_from_iterator(get_all_sentences(ds, lang), trainer=trainer) else : tokenizer = Tokenizer.from_file(str (tokenizer_path)) return tokenizer
以及从数据集中生成句子的工具函数:
1
2
3
4
5
6
7
8
9
10
def get_all_sentences (ds, lang ): """ 从数据集中取指定语言的句子 参数: `ds`: 数据集 `lang`: 指定语言 `"en"`或`"it"` """ for item in ds: yield item['translation' ][lang]
在Hugging Face中下载数据集:
1
2
3
4
5
6
7
8
9
10
11
12
13
14
15
def get_ds (config ): """ 加载数据集并创建分词器 """ ds_raw = load_dataset('opus_books' , f'{config["lang_src" ]} -{config["lang_tgt" ]} ' , split='train' ) tokenizer_src = get_or_build_tokenizer(config, ds_raw, config['lang_src' ]) tokenizer_tgt = get_or_build_tokenizer(config, ds_raw, config['lang_tgt' ]) train_ds_size = int (0.9 * len (ds_raw)) val_ds_size = len (ds_raw) - train_ds_size train_ds_raw, val_ds_raw = random_split(ds_raw, [train_ds_size, val_ds_size])
此时需要处理数据集训练模型,我们先编写dataset.py为模型准备数据。
2 Dataset 新建文件dataset.py,以生成用于输入模型的由张量组成的数据集。初始化BilingualDataset:
1
2
3
4
5
6
7
8
9
10
11
12
13
14
15
16
17
18
class BilingualDataset (Dataset ): def __init__ (self, ds, tokenizer_src, tokenizer_tgt, src_lang, tgt_lang, seq_len ) -> None : super ().__init__() self.ds = ds self.tokenizer_src = tokenizer_src self.tokenizer_tgt = tokenizer_tgt self.src_lang = src_lang self.tgt_lang = tgt_lang self.seq_len = seq_len self.sos_token = torch.tensor([tokenizer_tgt.token_to_id("[SOS]" )], dtype=torch.int64) self.eos_token = torch.tensor([tokenizer_tgt.token_to_id("[EOS]" )], dtype=torch.int64) self.pad_token = torch.tensor([tokenizer_tgt.token_to_id("[PAD]" )], dtype=torch.int64) def __len__ (self ): return len (self.ds)
然后编写关键的函数__getitem__,用于将原始数据转换为张量。
1
2
3
4
def __getitem__ (self, index ): src_target_pair = self.ds[index] src_text = src_target_pair['translation' ][self.src_lang] tgt_text = src_target_pair['translation' ][self.tgt_lang]
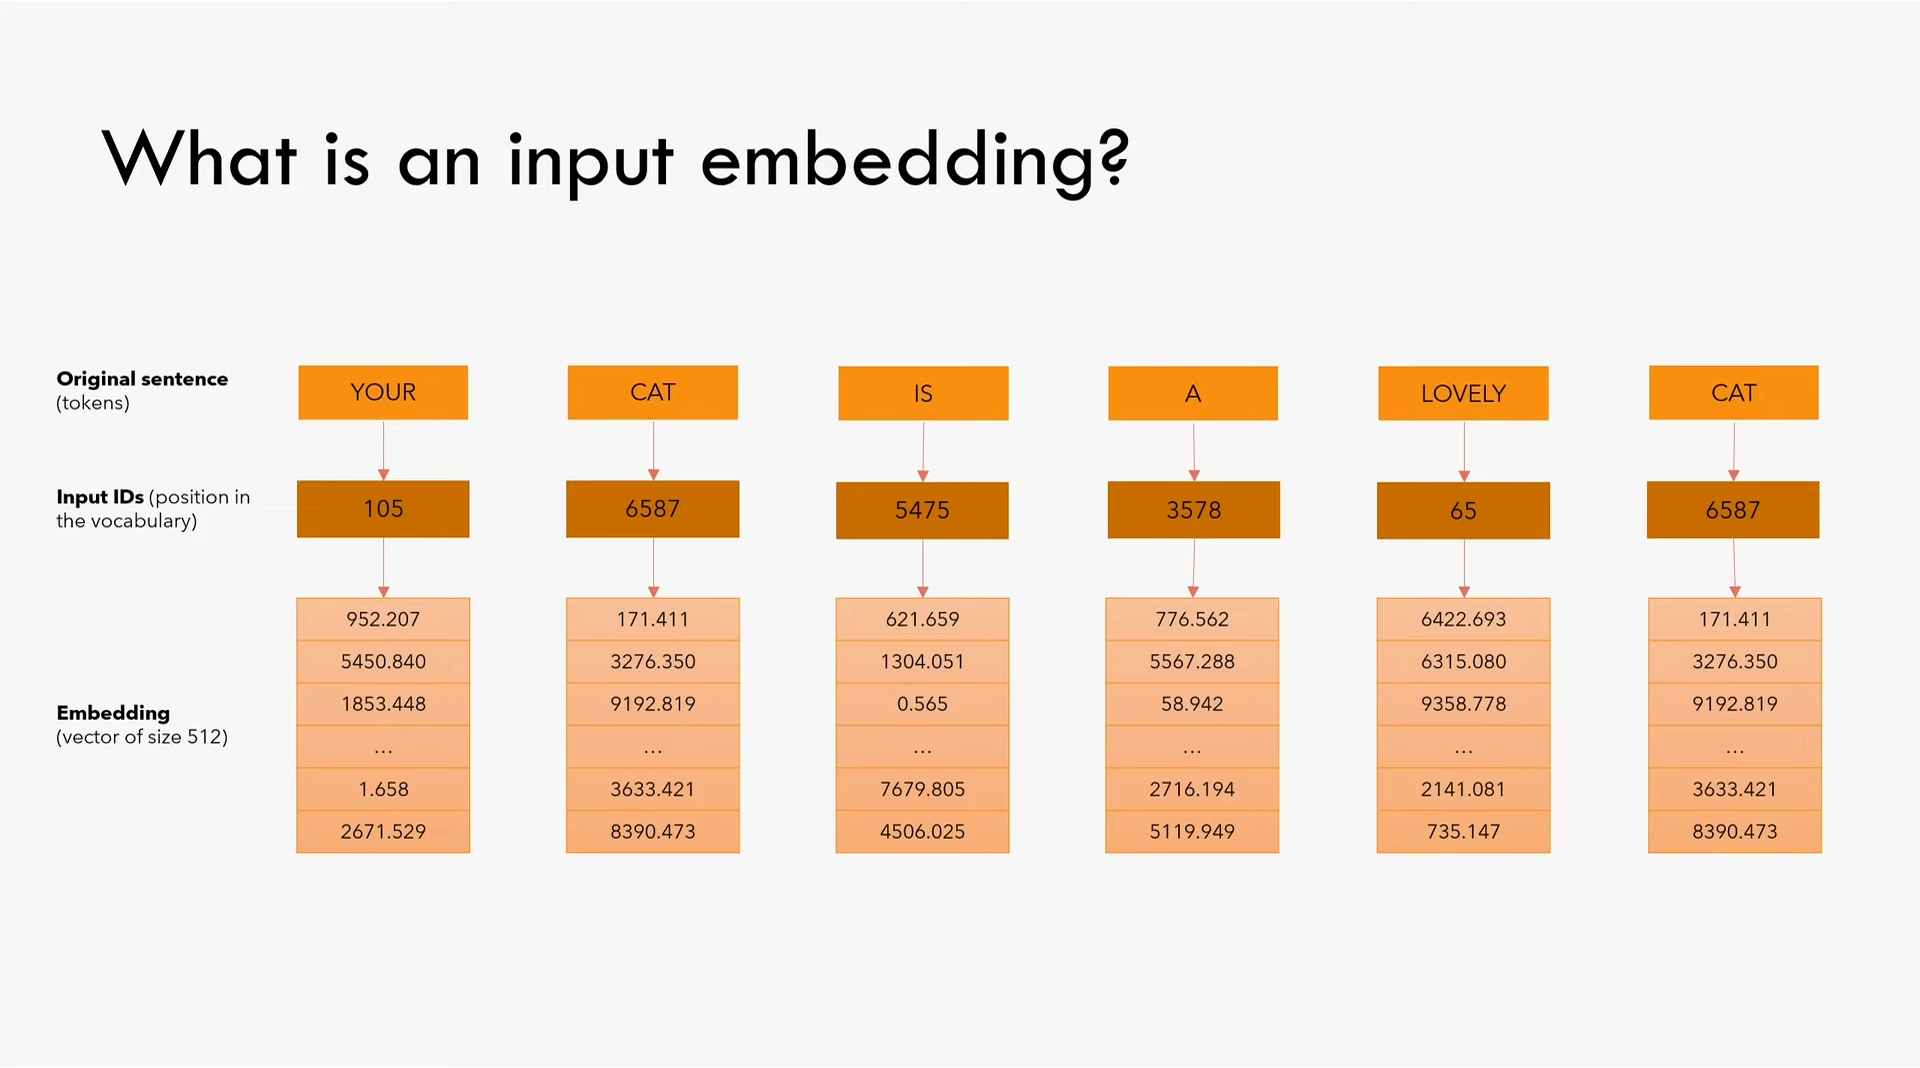
先将文本转换为token,再转换成id,即tokenizer先将句子拆分成词,再将词转换成词表中的id:
1 2 3 enc_input_tokens = self.tokenizer_src.encode(src_text).ids dec_input_tokens = self.tokenizer_tgt.encode(tgt_text).ids
然后计算需要填充(padding)的token数量,以使句子长度总能达到seq_len。此外,因为decoder的输入只有[SOS]没有[EOS],而decoder的输出(也叫做label,即期望的翻译结果)只有[EOS]没有[SOS],所以此处的padding会多一个token:
1 2 3 4 enc_num_padding_tokens = self.seq_len - len (enc_input_tokens) - 2 dec_num_padding_tokens = self.seq_len - len (dec_input_tokens) - 1
这里需要确保确保选择的seq_len长度满足所有样本,即填充的token数量应该不为负数:
1 2 3 4 if enc_num_padding_tokens < 0 or dec_num_padding_tokens < 0 : raise ValueError('Sentence is too long' )
为encoder的输入组装tensor,依次为:'[SOS]'、输入tensor、'[EOS]'和填充'[PAD]'*enc_num_padding_tokens:
1 2 3 4 5 6 7 encoder_input = torch.cat([ self.sos_token, torch.tensor(enc_input_tokens, dtype=torch.int64), self.eos_token, torch.tensor([self.pad_token] * enc_num_padding_tokens, dtype=torch.int64) ])
为decoder的输入组装tensor,依次为:'[SOS]'、输入tensor和填充'[PAD]'*enc_num_padding_tokens(没有'[EOS]'):
1 2 3 4 5 6 decoder_input = torch.cat([ self.sos_token, torch.tensor(dec_input_tokens, dtype=torch.int64), torch.tensor([self.pad_token] * dec_num_padding_tokens, dtype=torch.int64) ])
为decoder的输出(即label)组装tensor,依次为:输入tensor、'[EOS]'和填充'[PAD]'*enc_num_padding_tokens(没有'[SOS]'):
1 2 3 4 5 6 label = torch.cat([ torch.tensor(dec_input_tokens, dtype=torch.int64), self.eos_token, torch.tensor([self.pad_token] * dec_num_padding_tokens, dtype=torch.int64) ])
此处再次检查填充后的tensor长度是否满足seq_len,并返回结果。其中,encoder的mask仅用于屏蔽掉填充的token,而decoder的mask用于屏蔽掉填充的token和未来的token:
1 2 3 4 5 6 7 8 9 10 11 12 13 14 15 assert encoder_input.size(0 ) == self.seq_lenassert decoder_input.size(0 ) == self.seq_lenassert label.size(0 ) == self.seq_lenreturn { 'encoder_input' : encoder_input, 'decoder_input' : decoder_input, 'encoder_mask' : (encoder_input != self.pad_token).unsqueeze(0 ).unsqueeze(0 ).int (), 'decoder_mask' : (decoder_input != self.pad_token).unsqueeze(0 ).unsqueeze(0 ).int () & causal_mask(decoder_input.size(0 )), 'label' : label, 'src_text' : src_text, 'tgt_text' : tgt_text, }
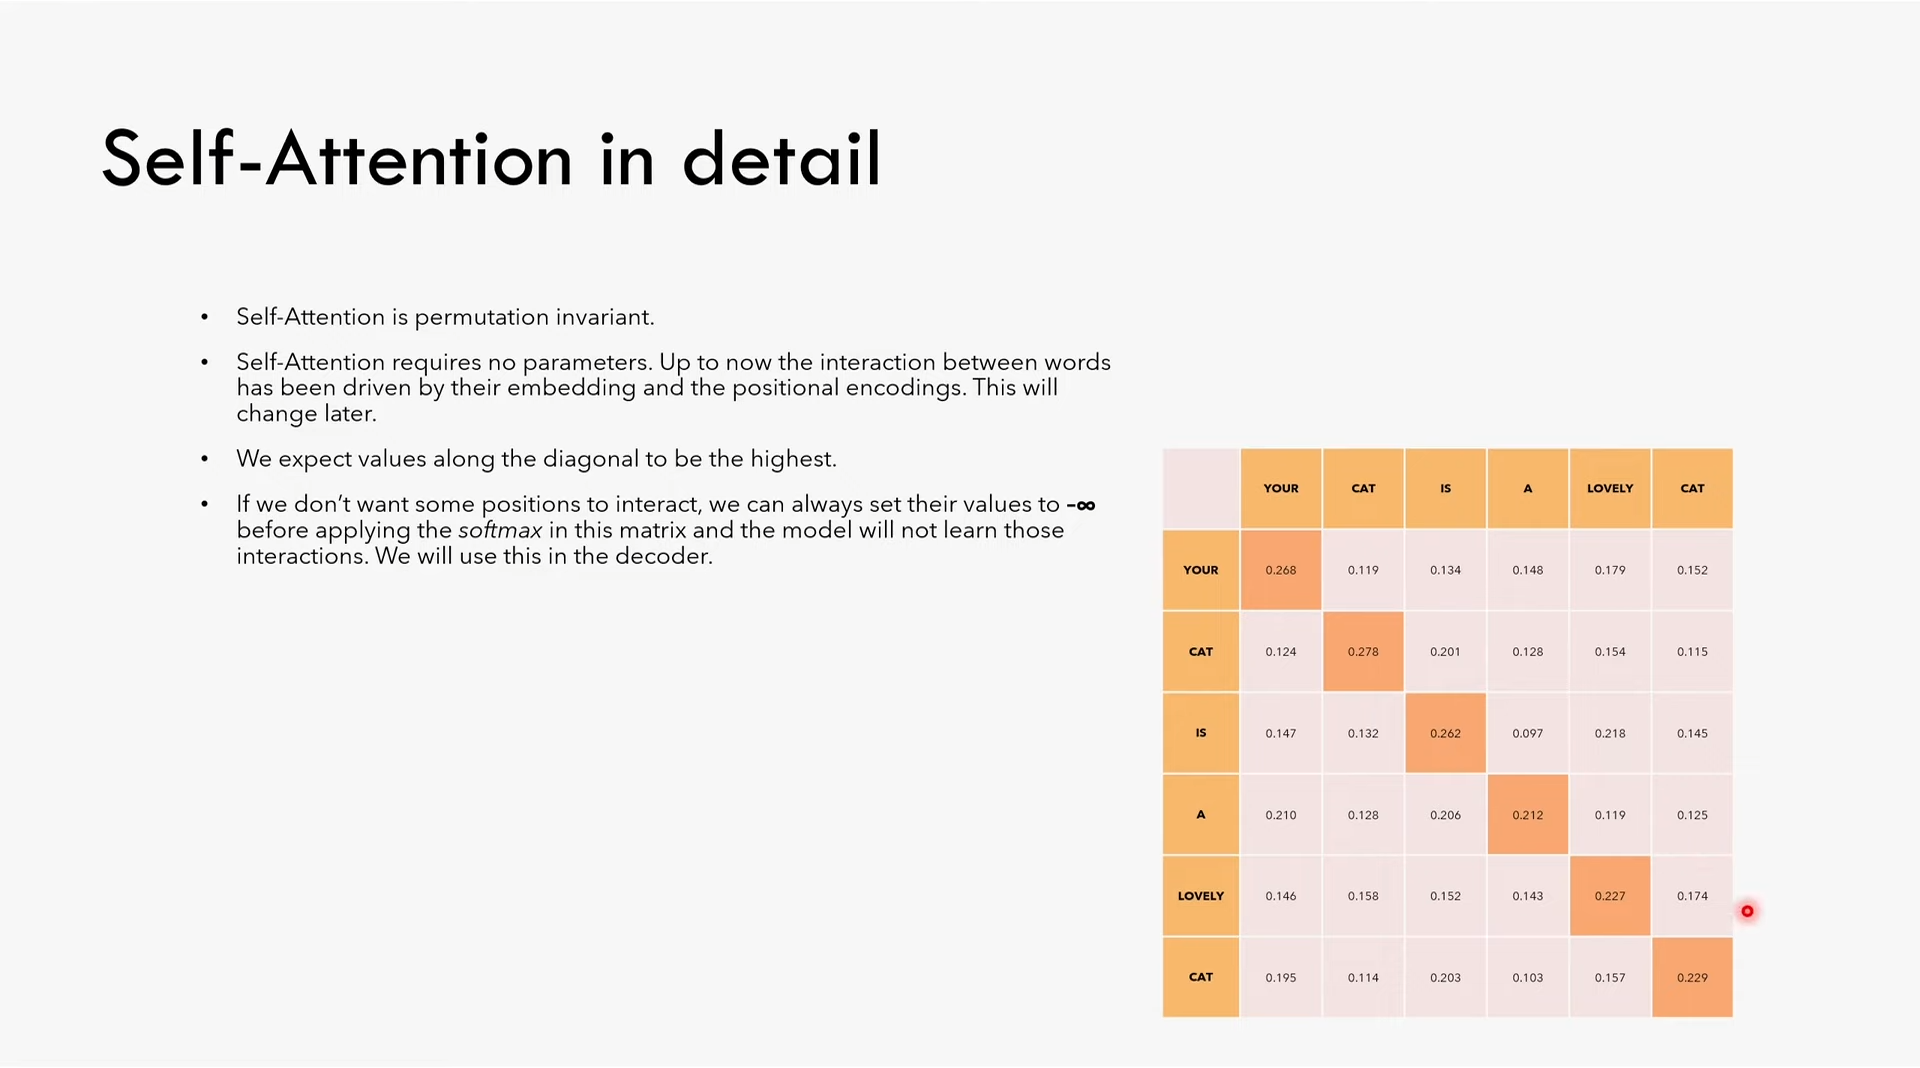
我们在上面使用了一个叫做causal_mask的函数,用于创建decoder的mask。该函数的作用是使得decoder只能看到之前的token,而不能看到未来的token。回顾一下Self-Attention的细节:
这个矩阵表示$Q\times K^T$,我们希望每个词只能看到它之前的词,因此需要使用mask隐藏矩阵对角元素之上的部分。在这个例子中,我们不希望YOUR看到CAT、IS、A、LOVELY、CAT,我们希望YOUR只能看到YOUR自己;而LOVELY则应该能看到它之前的词,即YOUR、CAT、IS、LOVELY,但看不到最后的词CAT。使用Pytorch可以方便的创建一个下三角矩阵:
1
2
3
4
5
def causal_mask (size ): mask = torch.triu(torch.ones(1 , size, size), diagonal=1 ).type (torch.int ) return mask == 0
我们完成了dataset.py中准备数据集的工作,接下来可以继续完成train.py中的训练模型的循环。
1
2
3
4
5
6
7
8
9
10
11
12
13
14
15
16
17
18
19
20
21
22
23
24
25
26
27
28
29
30
31
32
33
34
35
36
37
38
39
40
from dataset import BilingualDataset, causal_maskdef get_ds (config ): """ 加载数据集并创建分词器 """ ds_raw = load_dataset('opus_books' , f'{config["lang_src" ]} -{config["lang_tgt" ]} ' , split='train' ) tokenizer_src = get_or_build_tokenizer(config, ds_raw, config['lang_src' ]) tokenizer_tgt = get_or_build_tokenizer(config, ds_raw, config['lang_tgt' ]) train_ds_size = int (0.9 * len (ds_raw)) val_ds_size = len (ds_raw) - train_ds_size train_ds_raw, val_ds_raw = random_split(ds_raw, [train_ds_size, val_ds_size]) train_ds = BilingualDataset(train_ds_raw, tokenizer_src, tokenizer_tgt, config['lang_src' ], config['lang_tgt' ], config['seq_len' ]) val_ds = BilingualDataset(val_ds_raw, tokenizer_src, tokenizer_tgt, config['lang_src' ], config['lang_tgt' ], config['seq_len' ]) max_len_src = 0 max_len_tgt = 0 for item in ds_raw: src_ids = tokenizer_src.encode(item['translation' ][config['lang_src' ]]).ids tgt_ids = tokenizer_tgt.encode(item['translation' ][config['lang_tgt' ]]).ids max_len_src = max (max_len_src, len (src_ids)) max_len_tgt = max (max_len_tgt, len (tgt_ids)) print (f"Max length of source language: {max_len_src} " ) print (f"Max length of target language: {max_len_tgt} " ) train_dataloader = DataLoader(train_ds, batch_size=config['batch_size' ], shuffle=True ) val_dataloader = DataLoader(val_ds, batch_size=1 , shuffle=True ) return train_dataloader, val_dataloader, tokenizer_src, tokenizer_tgt
3 Trainning Loop 到这里,我们已经准备好了模型和数据集,可以开始训练模型了。首先是创建模型:
1
2
3
4
5
6
7
8
9
from model import build_transformerdef get_model (config, vocab_src_len, vocab_tgt_len ): """ 创建模型 """ model = build_transformer(vocab_src_len, vocab_tgt_len, config['seq_len' ], config['seq_len' ], config['d_model' ]) return model
在前面的文章中,我们只是使用了很多次config但是从来没有定义这个模型配置文件,现在我们来定义这个配置文件,新建config.py:
1
2
3
4
5
6
7
8
9
10
11
12
13
14
15
16
17
18
19
20
21
22
23
24
25
26
27
28
29
30
from pathlib import Pathdef get_config (): return { "batch_size" : 8 , "num_epochs" : 20 , "lr" : 10 **-4 , "seq_len" : 350 , "d_model" : 512 , "lang_src" : "en" , "lang_tgt" : "it" , "model_folder" : "weights" , "model_basename" : "tmodel_" , "preload" : None , "tokenizer_file" : "tokenizer_{0}.json" , "experiment_name" : "runs/tmodel" } def get_weights_file_path (config, epoch: str ): model_folder = config["model_folder" ] model_basename = config["model_basename" ] model_filename = f"{model_basename} {epoch} .pt" return str (Path('.' ) / model_folder / model_filename)
接下来开始编写训练模型的代码。本文使用tensorboard观察模型训练细节,要在本地使用tensorboard,可以安装tensorboard和torch_tb_profiler:
1 pip install tensorboard torch_tb_profiler
然后在命令行中运行:
1 tensorboard --logdir runs
即可打开tensorboard,在浏览器中访问http://localhost:6006/即可查看tensorboard的界面。或是在vscode中安装tensorboard插件,然后点击代码中的“启动TensorBoard会话”按钮,即可打开tensorboard。
为预加载权重编写代码,若指定了预加载的模型,则直接加载。此外,指定loss函数,声明padding不参与loss计算。同时,使用label smoothing,让模型降低对计算结果的确定性,即减少本次推理结果的概率,并把减少的部分分配到其他可能的推理结果上。实测可以提升模型的泛化能力,降低过拟合。
1
2
3
4
5
6
7
8
9
10
11
12
13
14
15
16
17
18
19
20
21
22
23
24
25
26
27
28
29
30
31
32
33
34
35
36
37
38
39
40
41
from torch.utils.tensorboard import SummaryWriterfrom config import get_weights_file_path, get_configfrom tqdm import tqdmdef train_model (config ): """ 训练模型 """ device = torch.device('cuda' if torch.cuda.is_available() else 'cpu' ) print (f"Using device: {device} " ) Path(config['model_folder' ]).mkdir(parents=True , exist_ok=True ) train_dataloader, val_dataloader, tokenizer_src, tokenizer_tgt = get_ds(config) model = get_model(config, tokenizer_src.get_vocab_size(), tokenizer_tgt.get_vocab_size()).to(device) writer = SummaryWriter(config['experiment_name' ]) optimizer = torch.optim.Adam(model.parameters(), lr=config['lr' ], eps=1e-9 ) initial_epoch = 0 global_step = 0 if config['preload' ]: model_filename = get_weights_file_path(config, config['preload' ]) print (f'Preloading model {model_filename} ' ) state = torch.load(model_filename) initial_epoch = state['epoch' ] + 1 optimizer.load_state_dict(state['optimizer_state_dict' ]) global_step = state['global_step' ] loss_fn = nn.CrossEntropyLoss(ignore_index=tokenizer_src.token_to_id('[PAD]' ), label_smoothing=0.1 ).to(device)
编写trainning loop,并在每个epoch结束时保存模型:
1
2
3
4
5
6
7
8
9
10
11
12
13
14
15
16
17
18
19
20
21
22
23
24
25
26
27
28
29
30
31
32
33
34
35
36
37
38
39
40
41
42
43
44
45
for epoch in range (initial_epoch, config['num_epochs' ]): model.train() batch_iterator = tqdm(train_dataloader, desc=f"Processing epoch {epoch:02d} " ) for batch in batch_iterator: encoder_input = batch['encoder_input' ].to(device) decoder_input = batch['decoder_input' ].to(device) encoder_mask = batch['encoder_mask' ].to(device) decoder_mask = batch['decoder_mask' ].to(device) encoder_output = model.encode(encoder_input, encoder_mask) decoder_output = model.decode(encoder_output, encoder_mask, decoder_input, decoder_mask) proj_output = model.project(decoder_output) label = batch['label' ].to(device) loss = loss_fn(proj_output.view(-1 , tokenizer_tgt.get_vocab_size()), label.view(-1 )) batch_iterator.set_postfix({f"loss" : f"{loss.item():6.3 f} " }) writer.add_scalar('train loss' , loss.item(), global_step) writer.flush() loss.backward() optimizer.step() optimizer.zero_grad() global_step += 1 model_filename = get_weights_file_path(config, f"{epoch:02d} " ) torch.save({ 'epoch' : epoch, 'model_state_dict' : model.state_dict(), 'optimizer_state_dict' : optimizer.state_dict(), 'global_step' : global_step, }, model_filename)
编写__main__函数执行训练:
1
2
3
4
5
6
import warningsif __name__ == '__main__' : warnings.filterwarnings('ignore' ) config = get_config() train_model(config)
此时就可以正常的开始模型训练了,如果编写正确的话,程序就会自动下载数据集并开始训练了。
在训练之前,我们还可以可视化训练的效果,比如查看模型预测的结果是否与真实结果是否一致,也就是validation,即观察模型在训练时是如何演化的。
4 Validation Loop 接下来编写validation loop,以便我们可以实时评估模型推理结果,观察模型是如何翻译数据集中并不在训练集当中的句子的。
1
2
3
4
5
6
7
8
9
10
11
12
13
14
15
16
17
18
19
20
21
22
23
24
25
26
def run_validation (model, validation_ds, tokenizer_src, tokenizer_tgt, max_len, device, print_msg, global_state, writer, num_examples=2 ): model.eval () count = 0 srouce_texts = [] expected = [] predicted = [] console_width = 80 with torch.no_grad(): for batch in validation_ds: count += 1 encoder_input = batch['encoder_input' ].to(device) encoder_mask = batch['encoder_mask' ].to(device) assert encoder_input.size(0 ) == 1 , "Batch size must be 1 for validation"
回忆Transformer模型,当我们想用模型进行推理时,只需要计算一次encoder_output,然后重复使用它来为每个token计算decoder_output,现在编写greedy_decode函数,用于生成翻译结果:
1
2
3
4
5
6
7
8
9
10
11
12
13
14
15
16
17
18
19
20
21
22
23
24
25
26
27
28
29
30
31
32
33
34
35
36
37
38
39
40
41
42
43
44
45
46
47
48
49
50
51
def greedy_decode (model, source, source_mask, tokenizer_src, tokenizer_tgt, max_len, device ): """ 使用贪婪策略,缓存encoder输出,计算decoder输出 参数: `model`: 模型 `source`: 源语言句子 `source_mask`: 源语言句子的padding mask `tokenizer_src`: 源语言的分词器 `tokenizer_tgt`: 目标语言的分词器 `max_len`: 句子最大长度 `device`: 运行模型的设备 """ sos_idx = tokenizer_tgt.token_to_id('[SOS]' ) eos_idx = tokenizer_tgt.token_to_id('[EOS]' ) encoder_output = model.encode(source, source_mask) decoder_input = torch.empty(1 , 1 ).fill_(sos_idx).type_as(source).to(device) while True : if decoder_input.size(1 ) == max_len: break decoder_mask = causal_mask(decoder_input.size(1 )).type_as(source_mask).to(device) out = model.decode(encoder_output, source_mask, decoder_input, decoder_mask) prob = model.project(out[:, -1 ]) _, next_word = torch.max (prob, dim=1 ) decoder_input = torch.cat([decoder_input, torch.empty(1 , 1 ).type_as(source).fill_(next_word.item()).to(device)], dim=1 ) if next_word == eos_idx: break return decoder_input.squeeze(0 )
继续编写run_validation函数:
1 2 3 4 5 6 7 8 9 10 11 12 13 14 15 16 17 18 19 20 21 22 23 24 25 assert encoder_input.size(0 ) == 1 , "Batch size must be 1 for validation" model_out = greedy_decode(model, encoder_input, encoder_mask, tokenizer_src, tokenizer_tgt, max_len, device) source_text = batch['src_text' ][0 ] target_text = batch['tgt_text' ][0 ] model_out_text = tokenizer_tgt.decode(model_out.detach().cpu().numpy()) source_texts.append(source_text) expected.append(target_text) predicted.append(model_out_text) print_msg('-' *console_width) print_msg(f"Source text: {source_text} " ) print_msg(f"TARGET text: {target_text} " ) print_msg(f"PREDICTED text: {model_out_text} " ) print_msg('-' *console_width) if count >= num_examples: break
最后,我们可以将run_validation函数添加到train_model函数中,放在每个epoch结束后:
1
2
3
4
5
6
7
global_step += 1 run_validation(model, val_dataloader, tokenizer_src, tokenizer_tgt, config['seq_len' ], device, lambda msg: batch_iterator.write(msg), global_step, writer) model_filename = get_weights_file_path(config, f"{epoch:02d} " )
5 Attention Visualization 可视化的代码中的大部分功能都不需要我们自己实现,前人已经帮我们完成了很多工作。这里使用jupyter notebook,新建attention_visual.ipynb文件。
这里除了之前我们自己写的模型和训练库以外,还使用了altair可视化库。
1
2
3
4
5
6
7
8
9
10
11
12
13
14
import torchimport torch.nn as nnfrom model import Transformerfrom config import get_config, get_weights_file_pathfrom train import get_model, get_ds, greedy_decodeimport altair as altimport pandas as pdimport numpy as npimport warningswarnings.filterwarnings('ignore' )
同之前一样,选择计算设备:
1 2 3 device = torch.device("cuda" if torch.cuda.is_available() else "cpu" ) print (f'Using device: {device} ' )
加载预训练模型的权重:
1
2
3
4
5
6
7
8
config = get_config() train_dataloader, val_dataloader, vocab_src, vocab_tgt = get_ds(config) model = get_model(config, vocab_src.get_vocab_size(), vocab_tgt.get_vocab_size()).to(device) model_filename = get_weights_file_path(config, f"03" ) state = torch.load(model_filename) model.load_state_dict(state['model_state_dict' ])
从验证集中选择一对样本:
1
2
3
4
5
6
7
8
9
10
11
12
13
14
15
16
17
18
19
def load_next_batch (): batch = next (iter (val_dataloader)) encoder_input = batch["encoder_input" ].to(device) encoder_mask = batch["encoder_mask" ].to(device) decoder_input = batch["decoder_input" ].to(device) decoder_mask = batch["decoder_mask" ].to(device) encoder_input_tokens = [vocab_src.id_to_token(idx) for idx in encoder_input[0 ].cpu().numpy()] decoder_input_tokens = [vocab_tgt.id_to_token(idx) for idx in decoder_input[0 ].cpu().numpy()] assert encoder_input.size( 0 ) == 1 , "Batch size must be 1 for validation" model_out = greedy_decode( model, encoder_input, encoder_mask, vocab_src, vocab_tgt, config['seq_len' ], device) return batch, encoder_input_tokens, decoder_input_tokens
可视化注意力矩阵的函数,这些函数基本都能从网上找到:
1
2
3
4
5
6
7
8
9
10
11
12
13
14
15
16
17
18
19
20
21
22
23
24
25
26
27
28
29
30
31
32
33
34
35
36
37
38
39
40
41
42
43
44
45
46
47
48
49
50
51
52
53
54
55
56
57
58
59
60
61
62
63
64
65
66
67
68
69
70
def mtx2df (m, max_row, max_col, row_tokens, col_tokens ): """ 生成一个可视化矩阵 """ return pd.DataFrame( [ ( r, c, float (m[r, c]), "%.3d %s" % (r, row_tokens[r] if len (row_tokens) > r else "<blank>" ), "%.3d %s" % (c, col_tokens[c] if len (col_tokens) > c else "<blank>" ), ) for r in range (m.shape[0 ]) for c in range (m.shape[1 ]) if r < max_row and c < max_col ], columns=["row" , "column" , "value" , "row_token" , "col_token" ], ) def get_attn_map (attn_type: str , layer: int , head: int ): """ 从指定的层和头获取attention map """ if attn_type == "encoder" : attn = model.encoder.layers[layer].self_attention_block.attention_scores elif attn_type == "decoder" : attn = model.decoder.layers[layer].self_attention_block.attention_scores elif attn_type == "encoder-decoder" : attn = model.decoder.layers[layer].cross_attention_block.attention_scores return attn[0 , head].data def attn_map (attn_type, layer, head, row_tokens, col_tokens, max_sentence_len ): """ 使用altair绘制attention map """ df = mtx2df( get_attn_map(attn_type, layer, head), max_sentence_len, max_sentence_len, row_tokens, col_tokens, ) return ( alt.Chart(data=df) .mark_rect() .encode( x=alt.X("col_token" , axis=alt.Axis(title="" )), y=alt.Y("row_token" , axis=alt.Axis(title="" )), color="value" , tooltip=["row" , "column" , "value" , "row_token" , "col_token" ], ) .properties(height=400 , width=400 , title=f"Layer {layer} Head {head} " ) .interactive() ) def get_all_attention_maps (attn_type: str , layers: list [int ], heads: list [int ], row_tokens: list , col_tokens, max_sentence_len: int ): charts = [] for layer in layers: rowCharts = [] for head in heads: rowCharts.append(attn_map(attn_type, layer, head, row_tokens, col_tokens, max_sentence_len)) charts.append(alt.hconcat(*rowCharts)) return alt.vconcat(*charts)
获取一对样本:
1
2
3
4
batch, encoder_input_tokens, decoder_input_tokens = load_next_batch() print (f'Source: {batch["src_text" ][0 ]} ' )print (f'Target: {batch["tgt_text" ][0 ]} ' )sentence_len = encoder_input_tokens.index("[PAD]" )
绘制Encoder的self-attention:
1
2
3
4
5
layers = [0 , 1 , 2 ] heads = [0 , 1 , 2 , 3 , 4 , 5 , 6 , 7 ] get_all_attention_maps("encoder" , layers, heads, encoder_input_tokens, encoder_input_tokens, min (20 , sentence_len))
绘制Decoder的self-attention:
1 2 get_all_attention_maps("decoder" , layers, heads, decoder_input_tokens, decoder_input_tokens, min (20 , sentence_len))
绘制Encoder-Decoder的cross-attention:
1 2 3 get_all_attention_maps("encoder-decoder" , layers, heads, encoder_input_tokens, decoder_input_tokens, min (20 , sentence_len))


