回头看来,Attention Is All You Need这篇文章是所有大模型的根基,从MLP、CNN、RNN发展而来的船新版本特征提取器。这次跟着油管UP Umar Jamil对照论文通过手写transformer来学习这个划时代的算法。Coding a Transformer from scratch on PyTorch, with full explanation, training and inference。本文以翻译任务为例,展示如何使用pytorch手写一个将英语翻译为意大利语的Transformer。
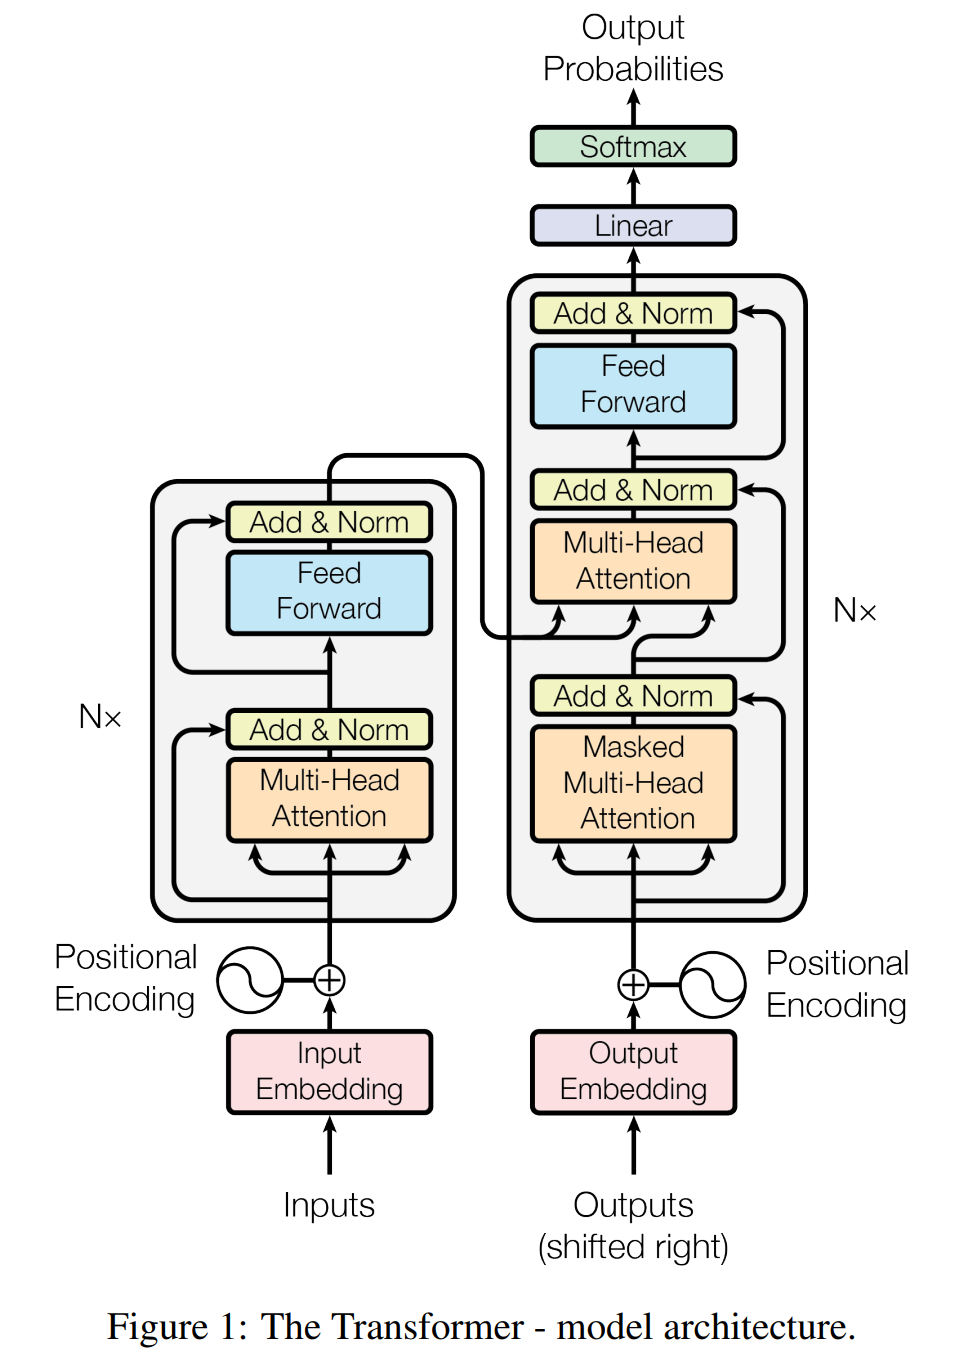
整个Transformer模型可以大致分为两个部分,Encoder和Decoder。新建文件model.py用于编写Transformer模型。
1 Encoder
Encoder由$N$个encoder模块首尾相接组合而成,每个encoder模块又包含了两个由Residual连接(也译为残差连接)的网络。
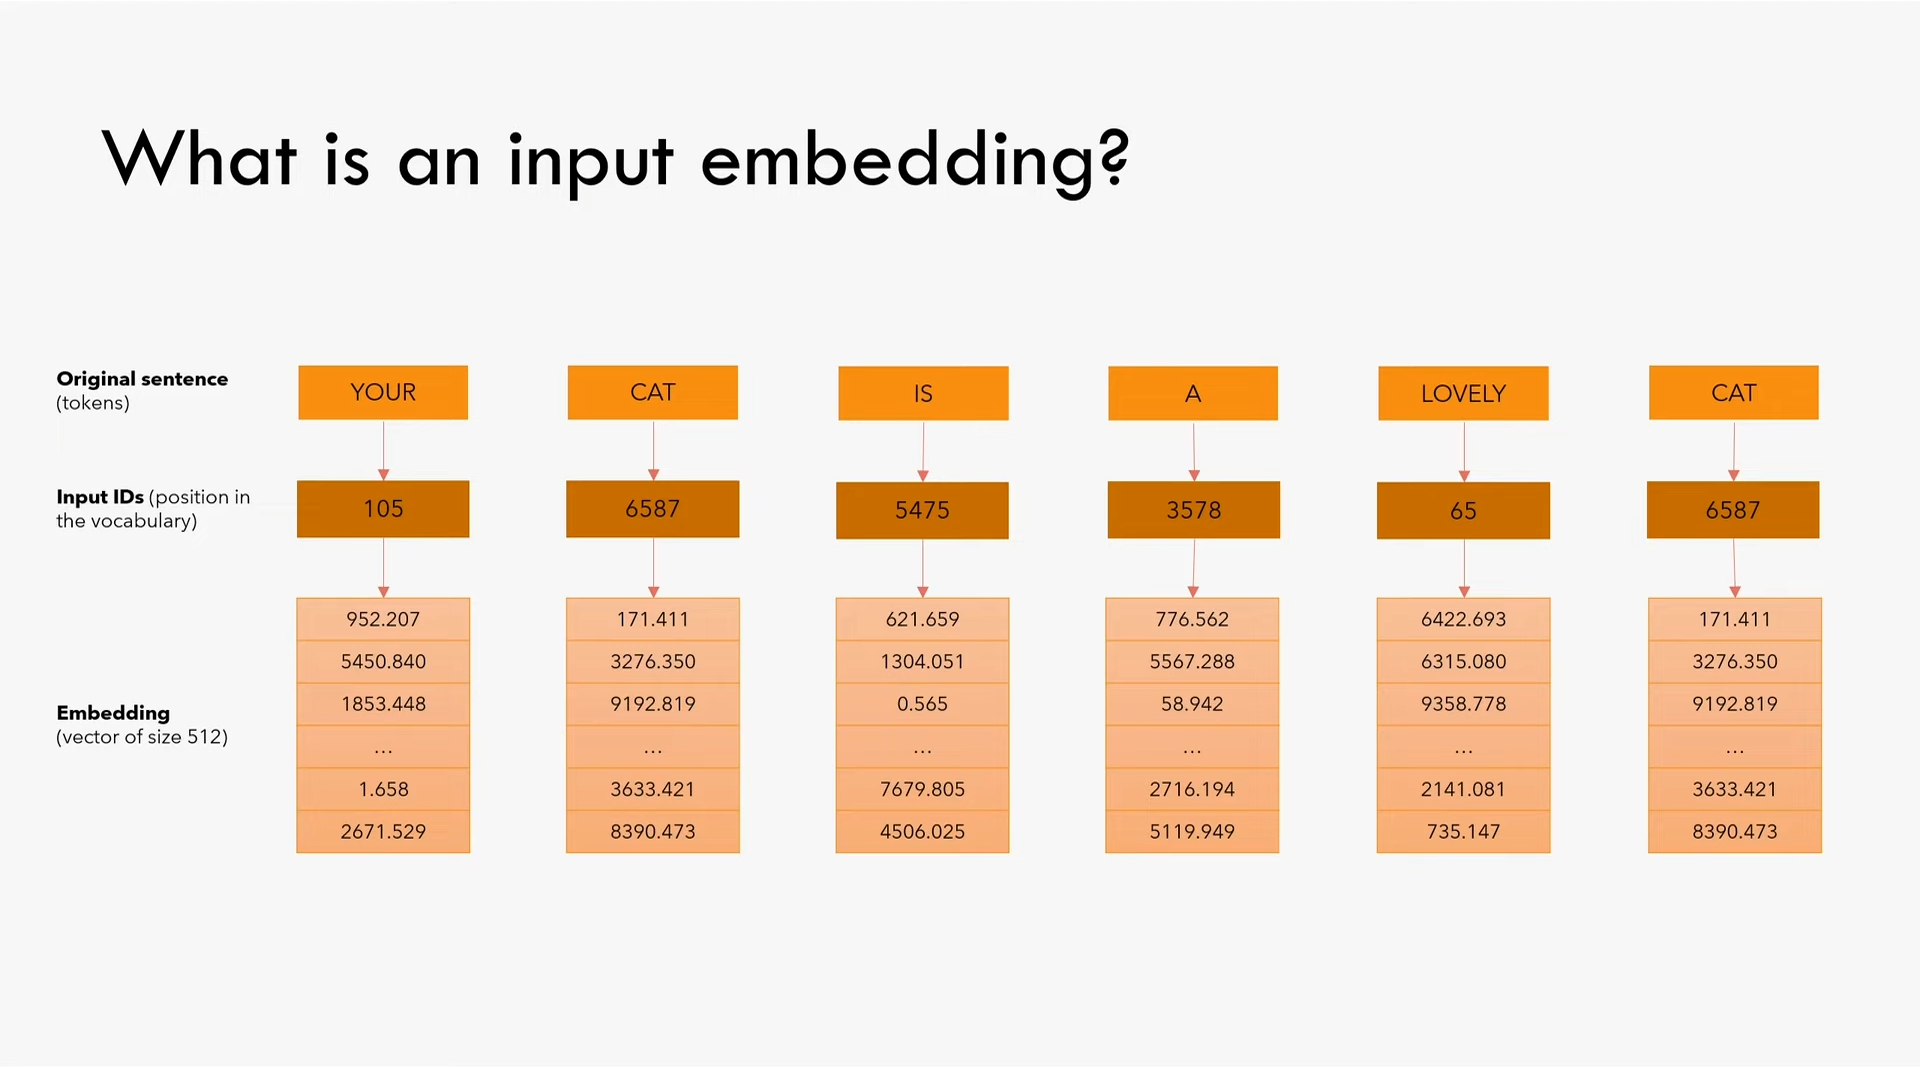
第一步是embedding(也译为词嵌入),就是给将单词表里的每个词一个编号,然后将这个编号映射为一个词向量,在本文中词向量大小为512维度。需要注意的是在论文3.4节中提到embedding需要乘以$\sqrt{d_{model}}$。
1
2
3
4
5
6
7
8
9
10
11
12
13
14
15
16
17
18
19
| import torch
import torch.nn as nn
import math
class InputEmbeddings(nn.Module):
def __init__(self, d_model: int, vocab_size: int) -> None:
super().__init__()
self.d_model = d_model
self.vocab_size = vocab_size
self.embedding = nn.Embedding(vocab_size, d_model)
def forward(self, x):
return self.embedding(x) * math.sqrt(self.d_model)
|
1.2 Positional Encoding
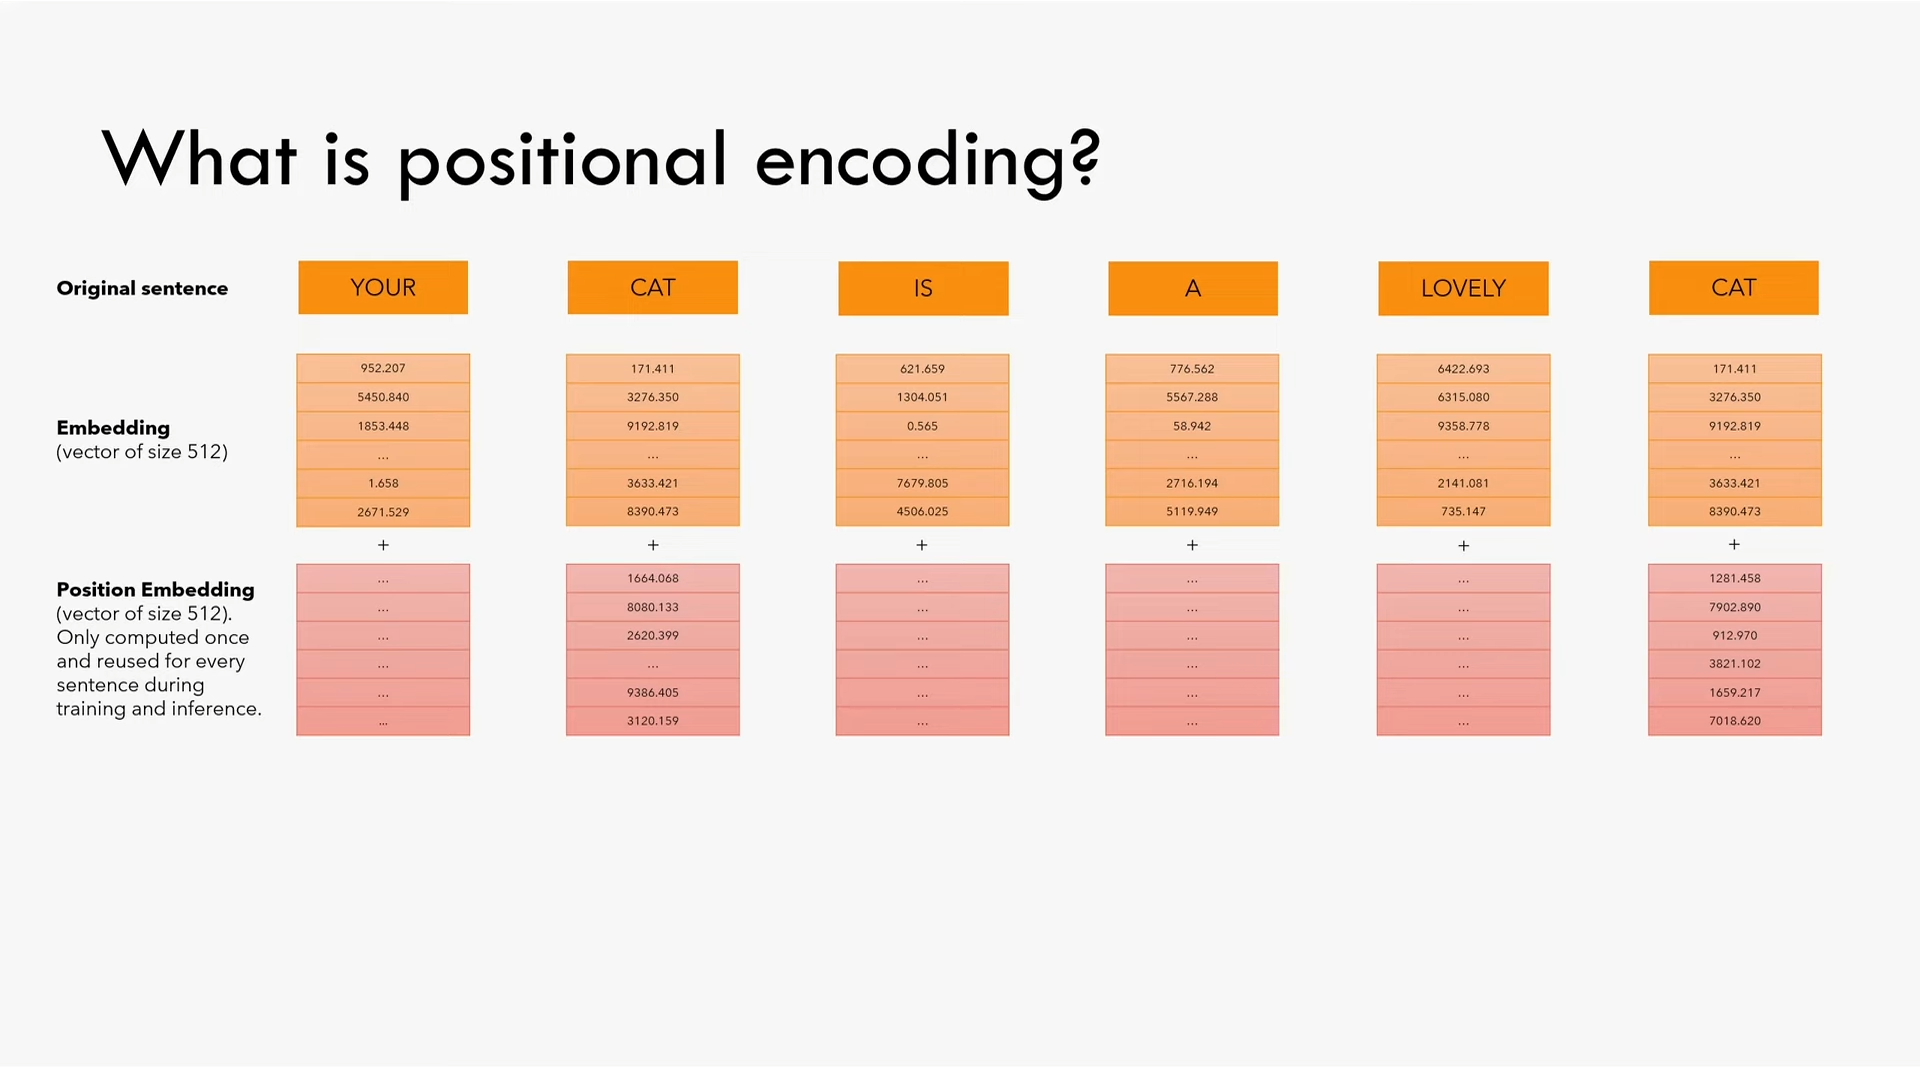
第二步需要将每个单词在句子中的位置信息告诉模型,位置编码与embedding的维度相同(本文中为512),然后将这个位置编码与前面的embedding相加。位置编码矩阵大小为(seq_len, d_model)。
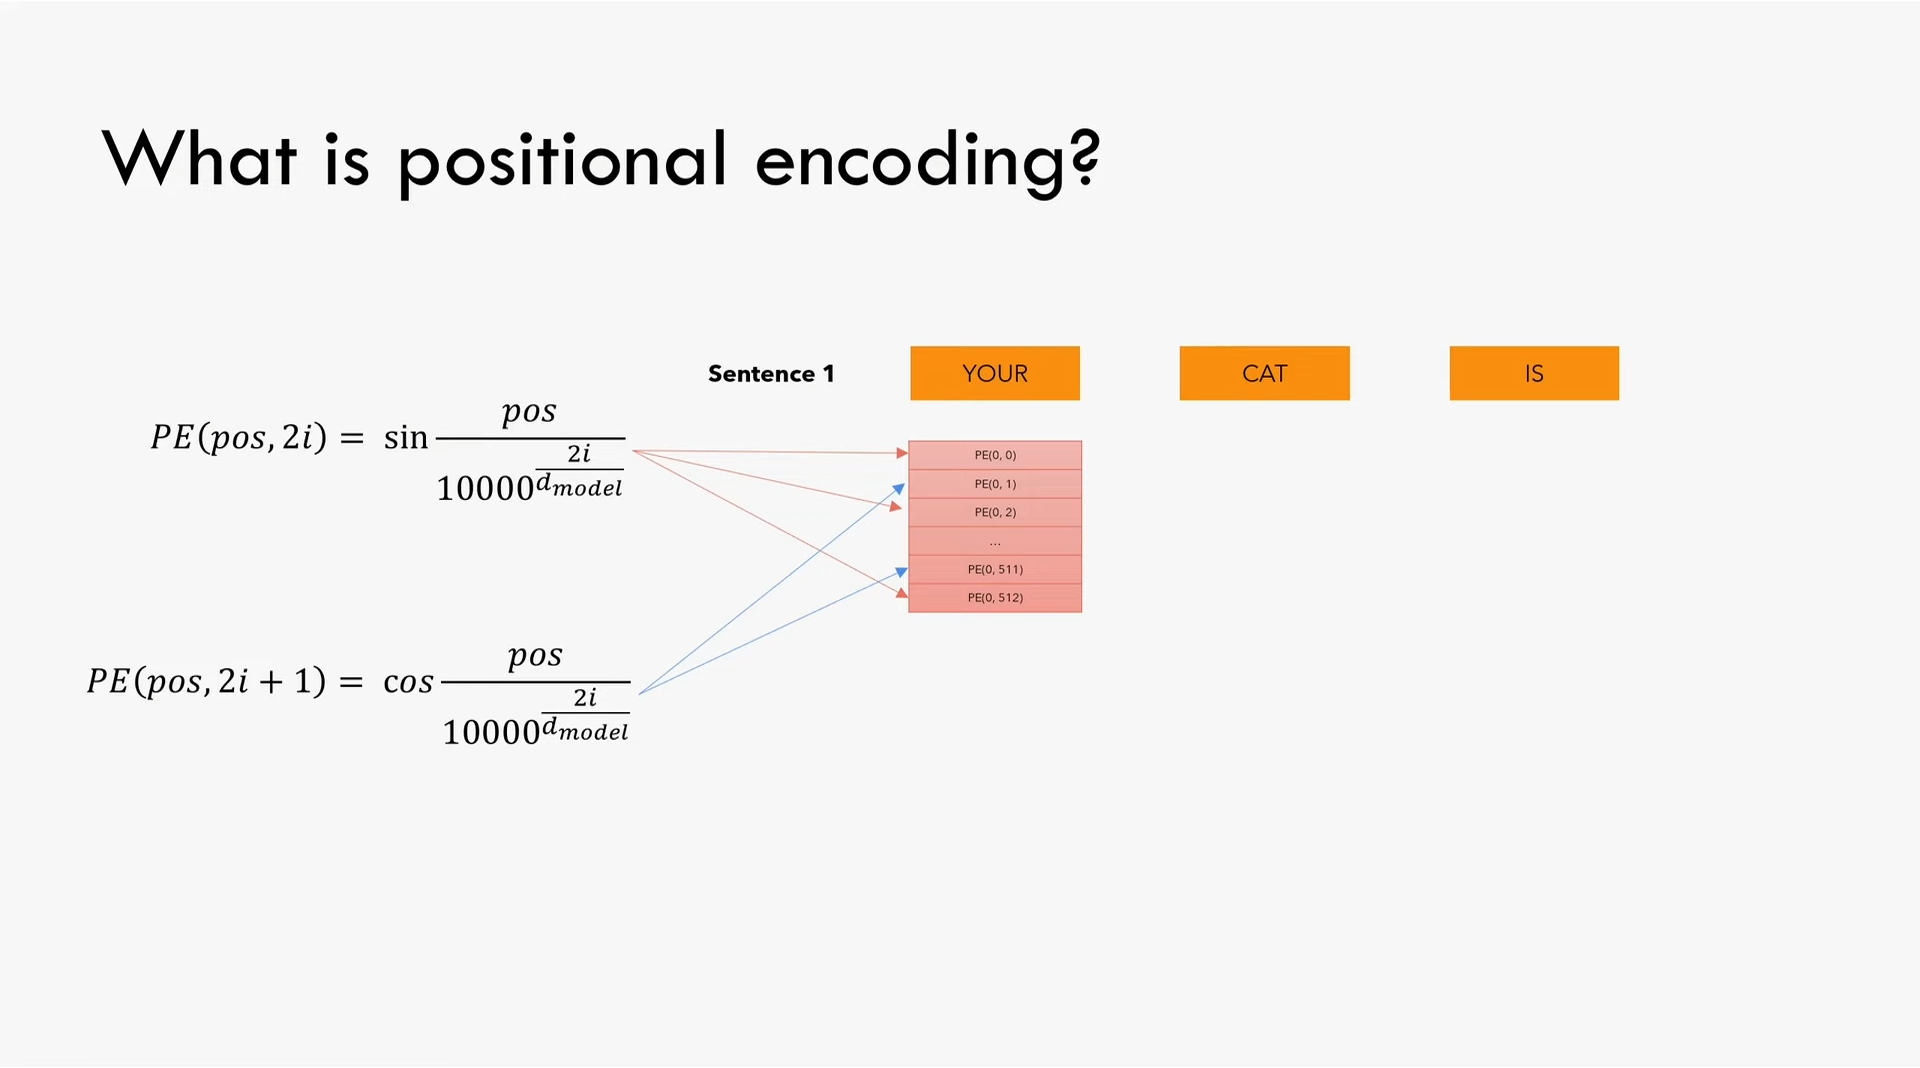
在位置向量的偶数元素使用公式$PE(pos, 2i)=\sin\frac{pos}{10000^\frac{2i}{d_{model}}}$,在奇数位置向量的奇数元素使用公式$PE(pos, 2i+1)=\cos\frac{pos}{10000^\frac{2i}{d_{model}}}$。为了计算的数值稳定性,我们对分母取对数和指数$\mathrm{e}^{\log_{\mathrm{e}}{10000\frac{2i}{d_{model}}}}$化简得到$\mathrm{e}^{2i\frac{\log_{\mathrm{e}}{10000}}{d_{model}}}$(这一项是分母所以代码中乘以这一项的负指数)。
1
2
3
4
5
6
7
8
9
10
11
12
13
14
15
16
17
18
19
20
21
22
23
24
25
26
27
28
29
30
31
32
33
| class PositionalEncoding(nn.Module):
def __init__(self, d_model: int, seq_len: int, dropout: float) -> None:
super().__init__()
self.d_model = d_model
self.seq_len = seq_len
self.dropout = nn.Dropout(dropout)
pe = torch.zeros(seq_len, d_model)
position = torch.arange(0, seq_len, dtype=torch.float).unsqueeze(1)
div_term = torch.exp(torch.arange(0, d_model, 2).float() * (-math.log(10000.0) / d_model))
pe[:, 0::2] = torch.sin(position * div_term)
pe[:, 1::2] = torch.cos(position * div_term)
pe = pe.unsqueeze(0)
self.register_buffer('pe', pe)
def forward(self, x):
x = x + (self.pe[:, :x.shape[1], :]).requires_grad_(False)
return self.dropout(x)
|
1.3 Normaliation
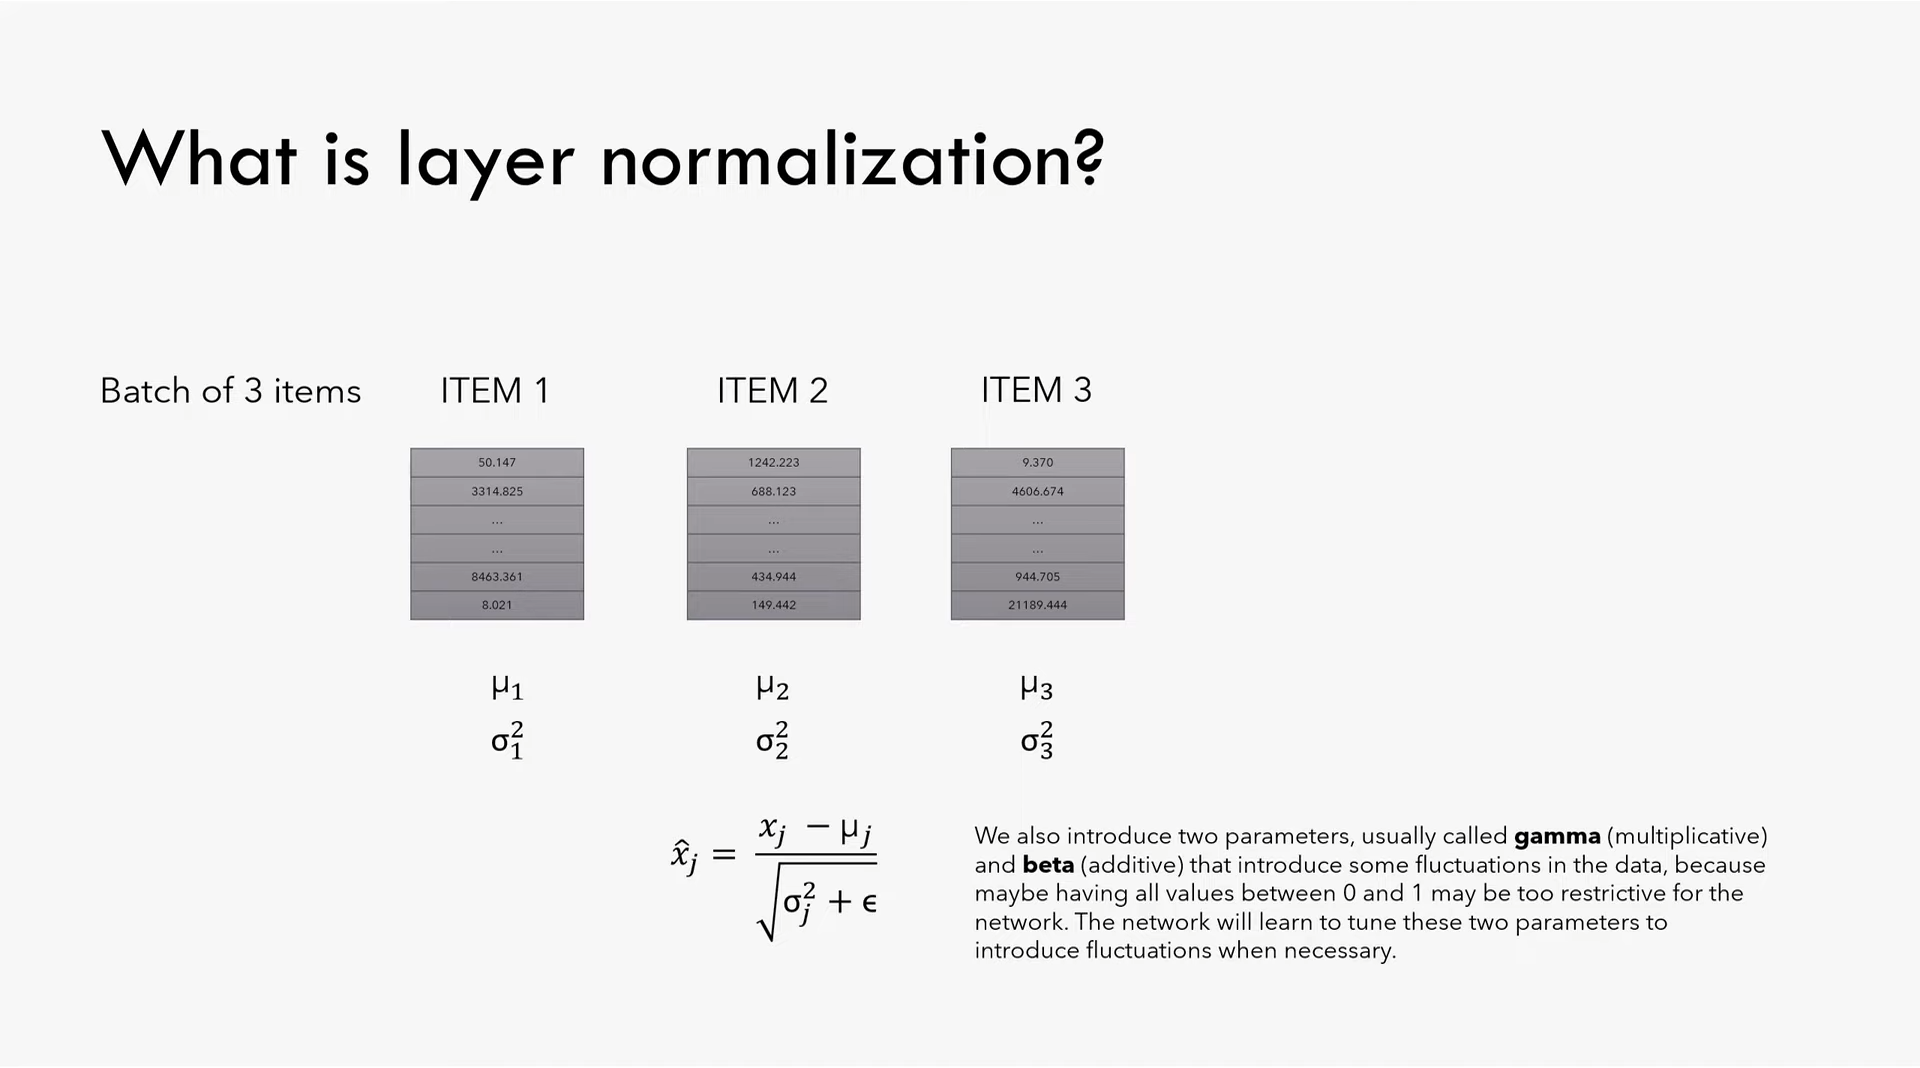
Normaliation(也译为归一化),是取一个batch中的每个item,计算他们在本batch中相对于其他item的期望$\mu$和方差$\sigma^{2}$,再使用$\mu$和$\sigma^{2}$计算这一项的新值$\hat{x_j}=\frac{x_j-\mu_j}{\sqrt{\sigma_{j}^{2}+\epsilon}}$。此外,引入两个会被学习的参数,乘数gamma(或叫做alpha)和加数beta(或叫做bias),以增加数值的差异,因为如果将所有值都限定在[0, 1]之间,数值的起伏可能会过小,因此有必要让模型自己学习调整这两个能够引入更大数值起伏的参数。另外,之所以需要$\epsilon$这个参数,主要是为了数值稳定性,比如$\sigma$过小时将会导致整个$\hat{x_j}$过大。
1
2
3
4
5
6
7
8
9
10
11
12
13
14
15
16
17
18
| class LayerNormalization(nn.Module):
def __init__(self, eps: float = 10**-6) -> None:
super().__init__()
self.eps = eps
self.alpha = nn.Parameter(torch.ones(1))
self.bias = nn.Parameter(torch.zeros(1))
def forward(self, x):
mean = x.mean(dim=-1, keepdim=True)
std = x.std(dim=-1, keepdim=True)
return self.alpha * (x - mean) / (std + self.eps) + self.bias
|
1.4 Feed Forward
一个简单的全连接层,论文提了用到的参数和激活函数relu。文中提到可以将这一步计算看做两个核大小为1的卷积层,输入输出维度为d_model=512,内部隐藏层维度为d_ff=2048。
1
2
3
4
5
6
7
8
9
10
11
12
13
14
| class FeedForwardBlock(nn.Module):
def __init__(self, d_model: int, d_ff: int, dropout: float) -> None:
super().__init__()
self.linear_1 = nn.Linear(d_model, d_ff)
self.dropout = nn.Dropout(dropout)
self.linear_2 = nn.Linear(d_ff, d_model)
def forward(self, x):
return self.linear_2(self.dropout(torch.relu(self.linear_1(x))))
|
1.5 Multi-Head Attention
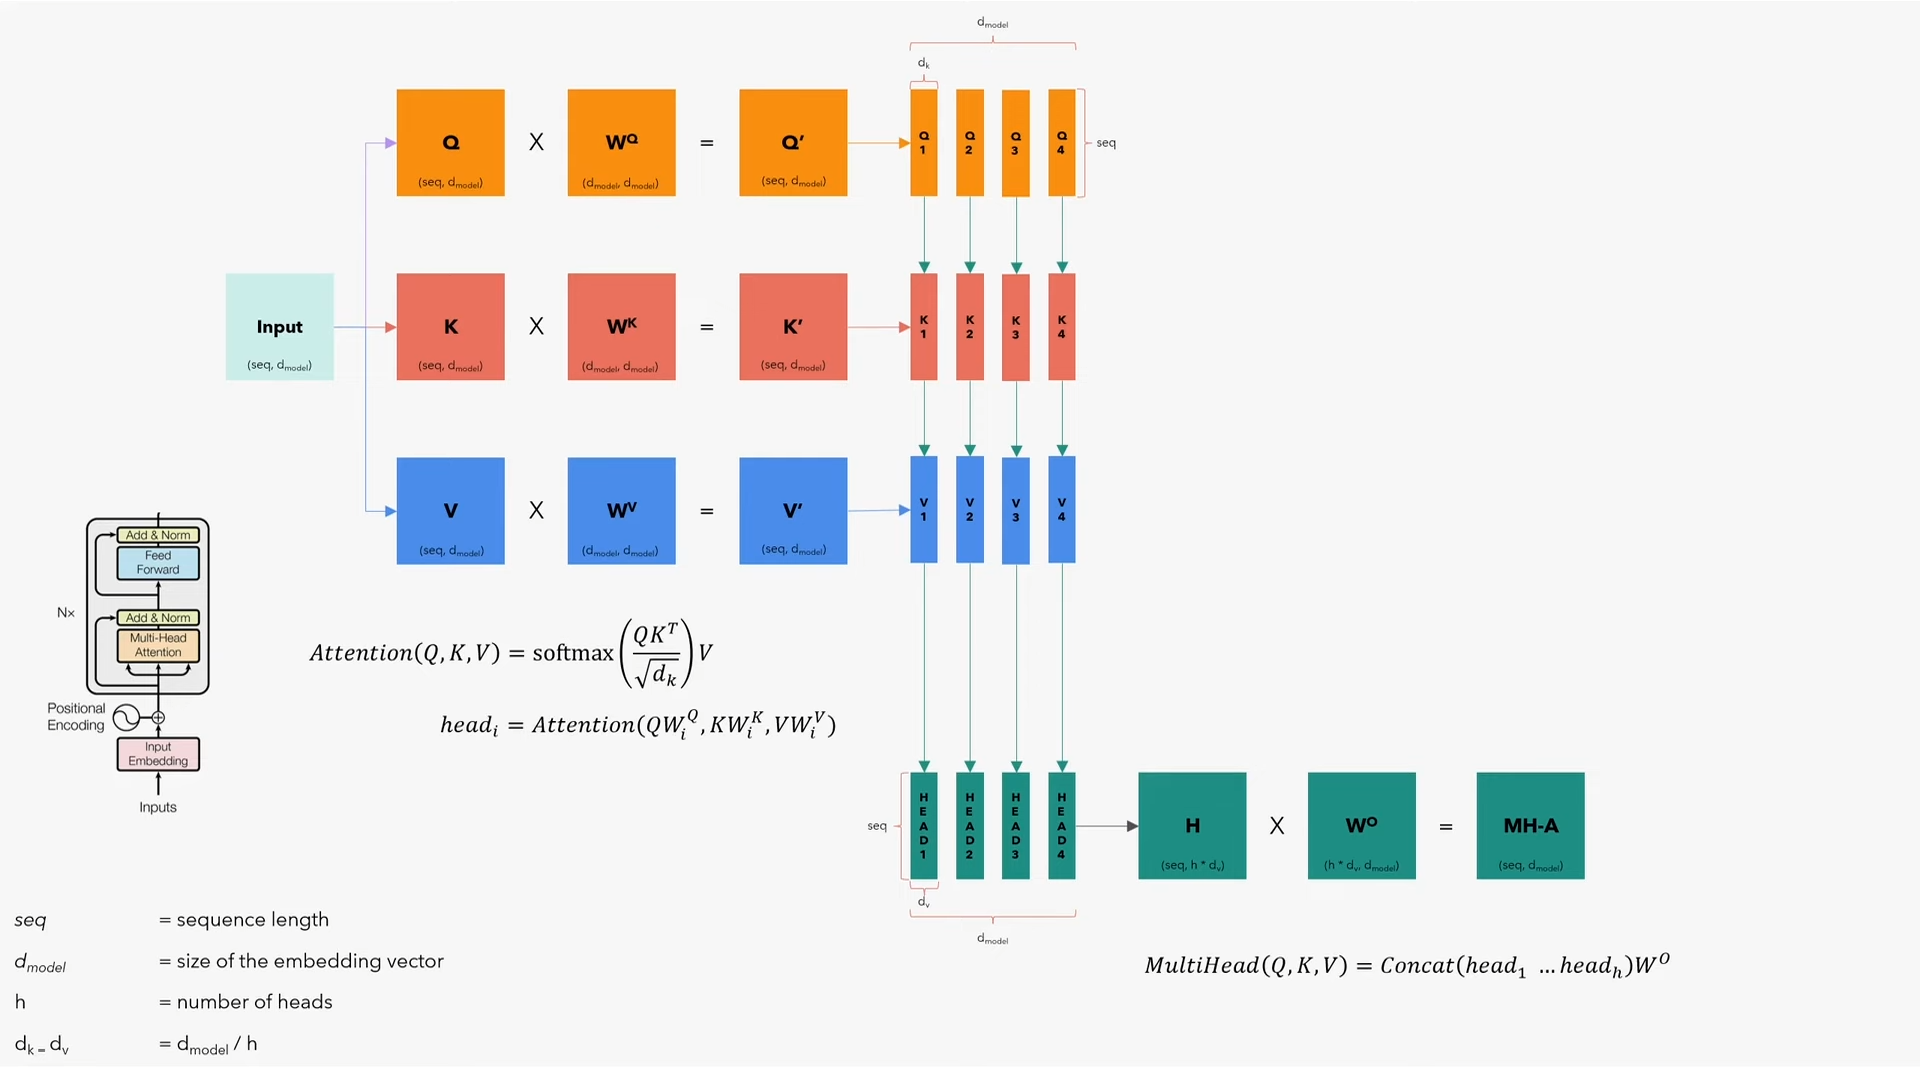
Encoder的重头戏,就是这个多头注意力层,需要注意的是,encoder和decoder的多头注意力层有些细微的区别。
先抛开batch维度,只关注算法,看看如何在一个句子上应用多头注意力模型。但需要记住,应用算法的时候,第一个维度是batch,程序会成批的输入句子。这里:
- $seq$为句子最大长度
- $d_{model}$为embedding向量的大小(本文中为512);
- $\mathrm{h}$为注意力头数
- $d_k=d_v$为$d_{model}/h$
从流程上来说:
- 先将输入复制三份,即Q、K、V矩阵(分别代表query、key、value,维度均为$(seq, d_{model})$);
- 分别乘以$W^Q$、$W^K$、$W^V$矩阵(维度均为$(d_{model}, d_{model})$),得到$Q’$、$K’$、$W’$(维度均为$(seq, d_{model})$);
- 沿embedding方向将$Q’$、$K’$、$W’$拆分为$h$个小矩阵$Q_i$、$K_i$、$W_i$(维度均为$(seq, d_k)$),即每个小矩阵都能拿到完整的句子,但都只拿到了embedding向量的一小部分;
- 应用注意力模型公式$Attention(Q, K, V)=\mathrm{softmax}(\frac{QK^T}{\sqrt{d_k}})V$,计算出每个头$head_i=Attention(QW_i^Q, KW_i^K, VW_i^V)$,其中的每个头$head_i$维度均为$(d_v, seq)$;
- 将$head_i$合并成矩阵$H$,维度为$(seq, h*d_v)$,即变回$(seq, d_{model})$,再乘以$W^O$矩阵(维度为$(h*d_v, d_{model})$),最终得到$MH\text{-}A$矩阵(维度为$(seq, d_{model})$),这一步的整体运算为$MultiHead(Q, K, V)=\mathrm{Concat}(head_1 \dots head_h)W^O$;
1
2
3
4
5
6
7
8
9
10
11
12
13
14
15
16
17
18
19
| class MultiHeadAttentionBlock(nn.Module):
def __init__(self, d_model: int, h: int, dropout: float) -> None:
super().__init__()
self.d_model = d_model
self.h = h
assert d_model % h == 0, "d_model不可被h整除"
self.d_k = d_model // h
self.w_q = nn.Linear(d_model, d_model)
self.w_k = nn.Linear(d_model, d_model)
self.w_v = nn.Linear(d_model, d_model)
self.w_o = nn.Linear(d_model, d_model)
self.dropout = nn.Dropout(dropout)
|
关于mask参数
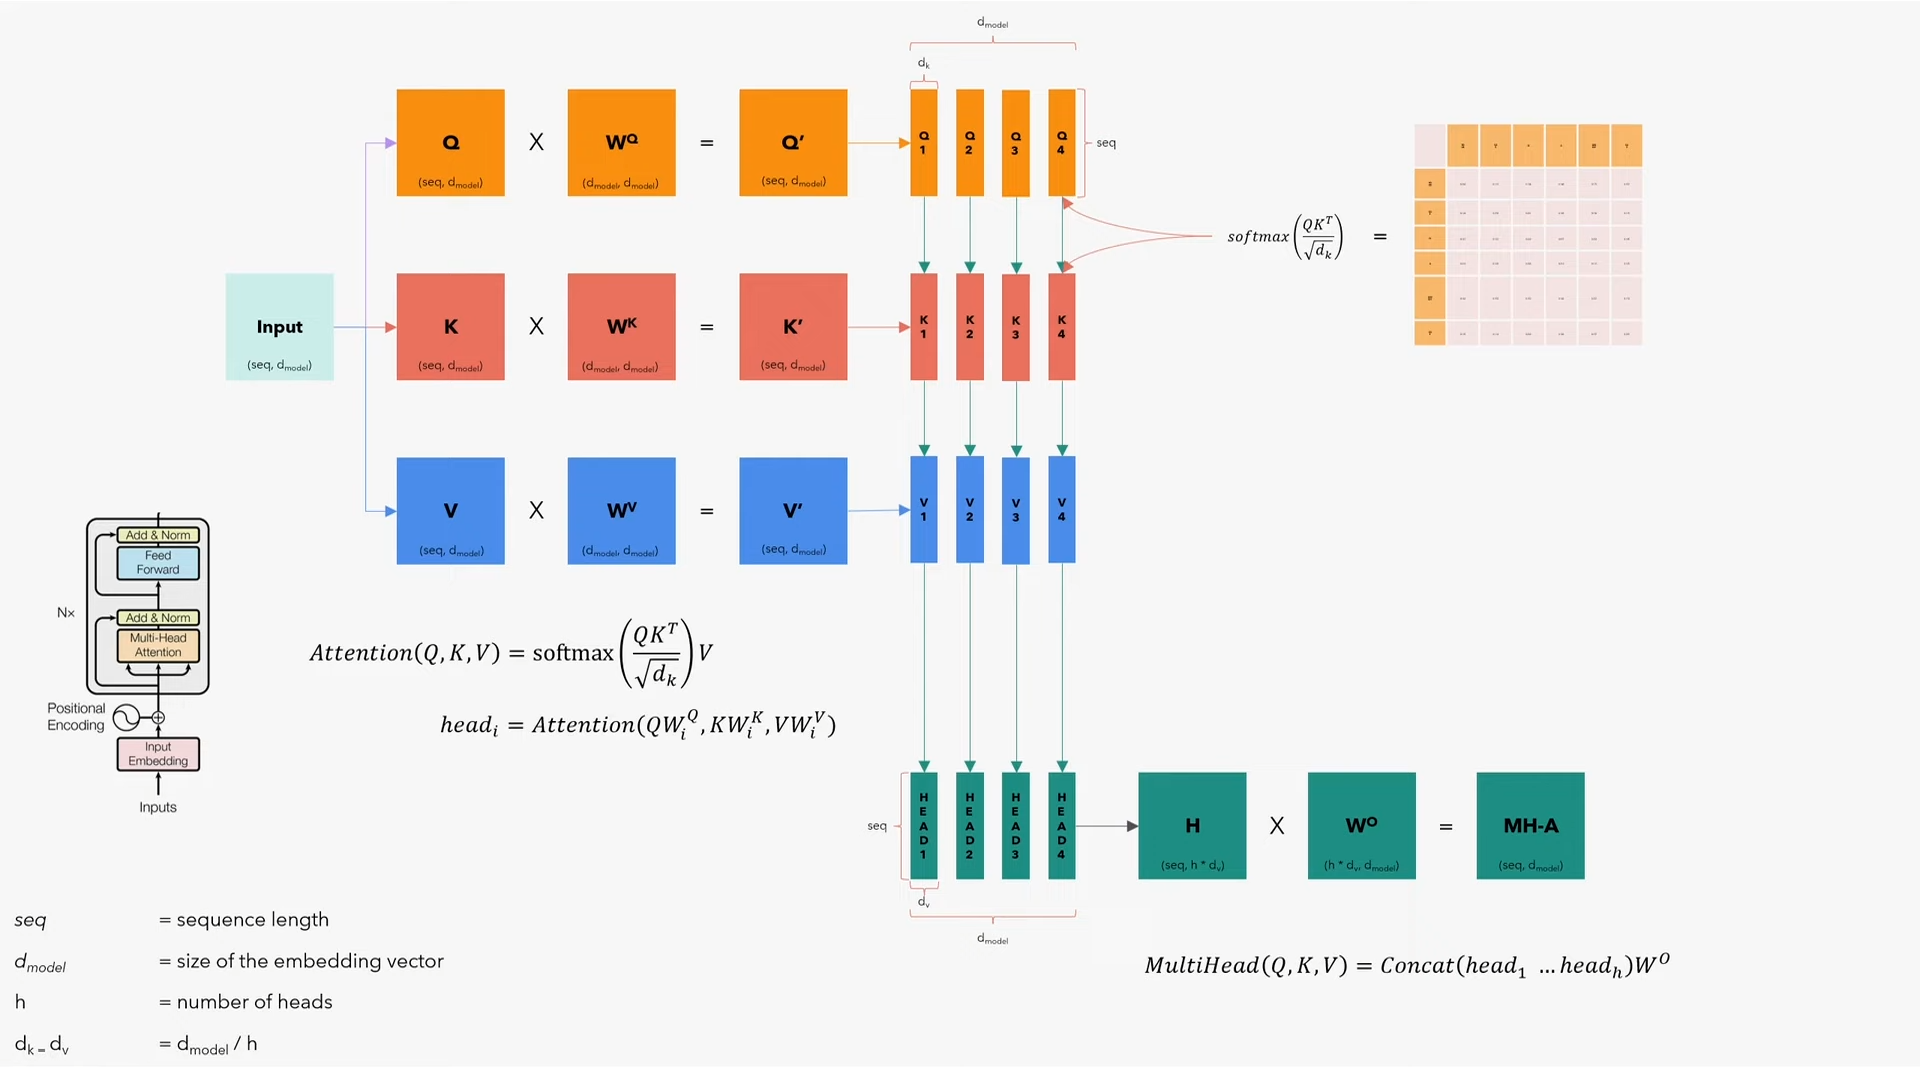
在计算$Attention(Q, K, V)=\mathrm{softmax}(\frac{QK^T}{\sqrt{d_k}})V$时,我们会先使用$Q$和$K$计算$\mathrm{softmax}(\frac{QK^T}{\sqrt{d_k}})$(即在乘以$V$之前)。$\frac{QK^T}{\sqrt{d_k}}$得到的是一个$(seq, seq)$的矩阵,其内容为各词与其他词的关系表。如果我们不希望某词与其他某词产生联系,就需要将矩阵中两词对应的位置写成负无穷,即使其注意力分数变得极小,此时在进行$\mathrm{softmax}$运算时,矩阵该位置的值就几乎为零,也就意味着屏蔽了这两个词的注意力——这就是mask参数的作用。
1
2
3
4
5
6
7
8
9
10
11
12
13
14
15
16
17
18
19
20
21
22
23
24
25
26
27
28
29
30
31
32
33
34
35
36
37
| @staticmethod
def attention(query, key, value, mask, dropout: nn.Dropout):
d_k = query.shape[-1]
attention_scores = (query @ key.transpose(-2, -1)) / math.sqrt(d_k)
if mask is not None:
attention_scores.masked_fill_(mask == 0, -1e9)
attention_scores = attention_scores.softmax(dim = -1)
if dropout is not None:
attention_scores = dropout(attention_scores)
return (attention_scores @ value), attention_scores
def forward(self, q, k, v, mask):
query = self.w_q(q)
key = self.w_k(k)
value = self.w_v(v)
query = query.view(query.shape[0], query.shape[1], self.h, self.d_k).transpose(1, 2)
key = key.view(key.shape[0], key.shape[1], self.h, self.d_k).transpose(1, 2)
value = value.view(value.shape[0], value.shape[1], self.h, self.d_k).transpose(1, 2)
x, self.attention_scores = MultiHeadAttentionBlock.attention(query, key, value, mask, self.dropout)
x = x.transpose(1, 2).contiguous().view(x.shape[0], -1, self.h * self.d_k)
return self.w_o(x)
|
1.6 Residual Connection
在Transformer模型中可以看到不少Residual连接(也译为残差连接),比如左侧一开始的Input Embedding+Positional Encoding既输出到Multi-Head Attention又输出到Add & Norm,或是接下来Add & Norm输出既到Feed Forward又到下一个Add & Norm。可以看出,模型中的残差连接都是用来连接Add & Norm及其前一层网络的:
1
2
3
4
5
6
7
8
9
10
11
| class ResidualConnection(nn.Module):
def __init__(self, dropout: float) -> None:
super().__init__()
self.dropout = nn.Dropout(dropout)
self.norm = LayerNormalization()
def forward(self, x, sublayer):
return x + self.dropout(sublayer(self.norm(x)))
|
1.7 Encoder Block
现在可以实现左侧整个encoder模块了,可以看出这个模块在模型中又N个,前一个encoder的输出送入后一个encoder做输入,最后一个encoder的输出送入decoder。Encoder中包含了一层Multi-Head Attention、一层Feed Forward、两层Add & Norm:
1
2
3
4
5
6
7
8
9
10
11
12
13
14
15
16
17
18
19
| class EncoderBlock(nn.Module):
def __init__(self, self_attention_block: MultiHeadAttentionBlock, feed_forward_block: FeedForwardBlock, dropout: float) -> None:
super().__init__()
self.self_attention_block = self_attention_block
self.feed_forward_block = feed_forward_block
self.residual_connection = nn.ModuleList([ResidualConnection(dropout) for _ in range(2)])
def forward(self, x, src_mask):
x = self.residual_connection[0](x, lambda x: self.self_attention_block(x, x, x, src_mask))
x = self.residual_connection[1](x, self.feed_forward_block)
return x
|
1.8 Encoder Module
然后将多个encoder模块首尾相接的组装在一起,最后添加一层Normalization形成模型的encoder:
1
2
3
4
5
6
7
8
9
10
11
| class Encoder(nn.Module):
def __init__(self, layers: nn.ModuleList) -> None:
super().__init__()
self.layers = layers
self.norm = LayerNormalization()
def forward(self, x, mask):
for layer in self.layers:
x = layer(x, mask)
return self.norm(x)
|
2 Decoder

再来观察一下Decoder。对于输入,Decoder的Output Embedding与Encoder的Input Embedding一样,都是用到同一张词表,而且Positional Encoding也是一样的。不一样的是上面的Decoder Block,可以看到首先是Masked Multi-Head Attention和残差连接到Add & Norm,然后又是Multi-Head Attention残差连接到Add & Norm,最后是Feed Forward残差连接到Add & Norm。可以发现我们前文中定义的MultiHeadAttentionBlock已经考虑到mask参数,因此只需要使用已经定义好的模块,把他们首尾相接,即可快速组装出这个decoder。
2.1 Decoder Block
编写decoder模块时需要注意,最下层的Multi-Head Attention仍然是”self attention”,而中间的Multi-Head Attention则变为”cross attention”,我们将会用到两种输入并计算他们之间的关系。另外,之所以代码中有src_mask和tgt_mask,是因为本文展示的是一个翻译任务,源语言为英语,目标语言为意大利语,所以从算法角度来说,也可以叫做enc_mask和dec_mask,只需要记住encoder和decoder各自都有一个mask。
1
2
3
4
5
6
7
8
9
10
11
12
13
14
15
16
17
18
| class DecoderBlock(nn.Module):
def __init__(self, self_attention_block: MultiHeadAttentionBlock, cross_attention_block: MultiHeadAttentionBlock, feed_forward_block: FeedForwardBlock, dropout: float) -> None:
super().__init__()
self.self_attention_block = self_attention_block
self.cross_attention_block = cross_attention_block
self.feed_forward_block = feed_forward_block
self.residual_connection = nn.ModuleList([ResidualConnection(dropout) for _ in range(3)])
def forward(self, x, encoder_output, src_mask, tgt_mask):
x = self.residual_connection[0](x, lambda x: self.self_attention_block(x, x, x, tgt_mask))
x = self.residual_connection[1](x, lambda x: self.cross_attention_block(x, encoder_output, encoder_output, src_mask))
x = self.residual_connection[2](x, self.feed_forward_block)
return x
|
2.2 Decoder Module
同encoder类似,decoder也是多个decoder模块首尾相连,最后添加一层Normalization的结构:
1
2
3
4
5
6
7
8
9
10
11
| class Decoder(nn.Module):
def __init__(self, layers: nn.ModuleList) -> None:
super().__init__()
self.layers = layers
self.norm = LayerNormalization()
def forward(self, x, encoder_output, src_mask, tgt_mask):
for layer in self.layers:
x = layer(x, encoder_output, src_mask, tgt_mask)
return self.norm(x)
|
3 Linear & Softmax
现在,Decoder的输出维度为$(seq, d_{model})$(仍然暂时忽略batch维度),我们想要将这些Embedding映射回词表,于是需要添加一层Linear将这些Embedding映射到词表中各词所在的位置上(因此也可以叫做Projection Layer投影层)。
1
2
3
4
5
6
7
8
9
10
| class ProjectionLayer(nn.Module):
def __init__(self, d_model: int, vocab_size: int) -> None:
super().__init__()
self.proj = nn.Linear(d_model, vocab_size)
def forward(self, x):
return torch.log_softmax(self.proj(x), dim=-1)
|
现在我们已经完成了Transformer模型中所有模块的编写,是时候将他们组装成一个完整的Transformer了。本文的例子为翻译任务,因此Transformer初始化时需要源语言的Embedding和目标语言的Embedding。我们在用三个函数分别实现encoder、decoder、project,而不是使用一个forward函数实现,因为在推理过程中,我们可以重用encoder的输出,而且将这部分输出另存一份有利于可视化理解注意力模型的计算过程。
1
2
3
4
5
6
7
8
9
10
11
12
13
14
15
16
17
18
19
20
21
22
23
24
25
26
27
| class Transformer(nn.Module):
def __init__(self, encoder: Encoder, decoder: Decoder,
src_embed: InputEmbeddings, tgt_embed: InputEmbeddings,
src_pos: PositionalEncoding, tgt_pos: PositionalEncoding,
projcetion_layer: ProjectionLayer) -> None:
super().__init__()
self.encoder = encoder
self.decoder = decoder
self.src_embed = src_embed
self.tgt_embed = tgt_embed
self.src_pos = src_pos
self.tgt_pos = tgt_pos
self.projcetion_layer = projcetion_layer
def encode(self, src, src_mask):
src = self.src_embed(src)
src = self.src_pos(src)
return self.encoder(src, src_mask)
def decode(self, encoder_output, src_mask, tgt, tgt_mask):
tgt = self.tgt_embed(tgt)
tgt = self.tgt_pos(tgt)
return self.decoder(tgt, encoder_output, src_mask, tgt_mask)
def project(self, x):
return self.projcetion_layer(x)
|
至此我们已经完成了所有模块的编写,还需要一个函数将这一大堆embedding、encoder、decoder模块赋超参数并完成初始化。
1
2
3
4
5
6
7
8
9
10
11
12
13
14
15
16
17
18
19
20
21
22
23
24
25
26
27
28
29
30
31
32
33
34
35
36
37
38
39
40
41
42
43
44
45
46
47
48
49
50
51
52
53
54
55
56
57
58
59
60
61
62
| def build_transformer(src_vocab_size: int, tgt_vocab_size: int,
src_seq_len: int, tgt_seq_len: int,
d_model: int = 512, N: int = 6, h: int = 8, dropout: float = 0.1, d_ff = 2048) -> Transformer:
"""构造Transformer,创建超参数,初始化参数。
参数:
`src_vocab_size`: 源语言的词表大小;
`tgt_vocab_size`: 目标语言的词表大小;
`src_seq_len`: 源语言语言句子最大长度;
`tgt_seq_len`: 目标语言句子最大长度;
(本文的范例为英语到意大利语的翻译,源和目标语言句子长度设置为相同大小。
但对于其他语言,可能存在源和目标语言相差非常大的情况,届时将这两个值设置为不同大小)
`d_model`: 模型大小,与论文一致预设为`512`;
`N`: encoder/decoder的数量,与论文一致预设为`6`;
`h`: 注意力头数,与论文一致预设为`8`;
`dropout`: 与论文一致预设为`0.1`;
`d_ff`: 前馈网络大小,与论文一致预设为`2048`。
返回:
一个完成了参数初始化的`Transformer`。
"""
src_embed = InputEmbeddings(d_model, src_vocab_size)
tgt_embed = InputEmbeddings(d_model, tgt_vocab_size)
src_pos = PositionalEncoding(d_model, src_seq_len, dropout)
tgt_pos = PositionalEncoding(d_model, tgt_seq_len, dropout)
encoder_blocks = []
for _ in range(N):
encoder_self_attention_block = MultiHeadAttentionBlock(d_model, h, dropout)
feed_forward_block = FeedForwardBlock(d_model, d_ff, dropout)
encoder_block = EncoderBlock(encoder_self_attention_block, feed_forward_block, dropout)
encoder_blocks.append(encoder_block)
decoder_blocks = []
for _ in range(N):
decoder_self_attention_block = MultiHeadAttentionBlock(d_model, h, dropout)
decoder_cross_attention_block = MultiHeadAttentionBlock(d_model, h, dropout)
feed_forward_block = FeedForwardBlock(d_model, d_ff, dropout)
decoder_block = DecoderBlock(decoder_self_attention_block, decoder_cross_attention_block, feed_forward_block, dropout)
decoder_blocks.append(decoder_block)
encoder = Encoder(nn.ModuleList(encoder_blocks))
decoder = Decoder(nn.ModuleList(decoder_blocks))
projection_layer = ProjectionLayer(d_model, tgt_vocab_size)
transformer = Transformer(encoder, decoder, src_embed, tgt_embed, src_pos, tgt_pos, projection_layer)
for p in transformer.parameters():
if p.dim() > 1:
nn.init.xavier_uniform_(p)
return transformer
|
最终,我们完成了一个Transformer的编写,这个过程详细展示了Transformer的内部结构,包括各模块的总体架构、每层的输入输出、各层计算过程及维度、模块间的关系等信息。接下来将要展示如何使用Transformer,包括搜集训练集数据,以及编写训练循环、推理过程、可视化等部分。


